0.57.0: Edit Scopes introduction
Gaffer 0.57.0.0 introduced Edit Scopes. They are fundamental in our endeavours to make Gaffer more user friendly for everyday tasks. They provide a container for node graph edits made by interactive tools in the UI. In this post, we take a quick look at how they work.
Check out the video above to see them in action then read on for more details.
TL;DR
- Create EditScope nodes to define parts of your graph that can be modified by Gaffer's tools when making edits.
- The Viewer's Edit Scope UI allows you to select which EditScope will be used by tools when creating and managing nodes.

- Currently the Viewer's Transform and Camera tools as well as the new pruning hotkey are scope aware.
- When no scope is selected, tools behave as normal - requiring you to provide a suitable node before you can make any changes.
- You can quickly open the UI for edits in your Edit Scopes using the jump menu
 .
. - You can edit the nodes inside an EditScope with the Node Editor as normal.
- You can add your own nodes to an EditScope, just make sure you maintain the connection from the input to the output.
Background
Gaffer's tools generally require a node to perform the actual changes required by the user. In many production scenarios, the distraction of making all these nodes manually makes working in Gaffer painful. Especially compared to some more 'immediate mode' tools that are prevalent in the industry. It's the price we pay for having the repeatability afforded by a node graph that describes what we did to build a scene, not the result.
How can we make working in Gaffer feel 'immediate', but still keep the repeatability and efficiency of a node graph for typical production workflows? Gaffer could easily make the required nodes for you, but where should they go in the graph?
Graph Structure

We noticed a common pattern occurring in people's Gaffer graphs. Box nodes would be used to mark where artist should place their nodes when working.
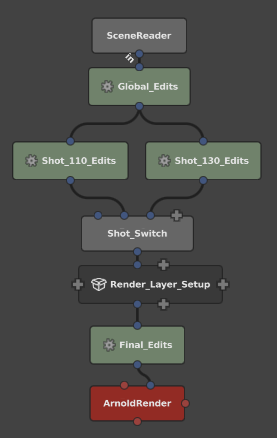
These boxes would be strategically placed such that they affected the scene at some logical level. In Sequence/Shot workflows, there may be boxes for global, per-sequence and per-shot edits.
We designed Edit Scopes to fit into this pattern of working - simply use an EditScope instead of a normal Box and you are telling Gaffer where it can put nodes it makes on your behalf.
The EditScope node

Edit scope nodes are blue, and sport a natty cog-in-a-box icon that help distinguish them from normal boxes. Like Boxes, they are generic nodes, in that they can be used in Scene or Image graphs.
The Edit Scope UI

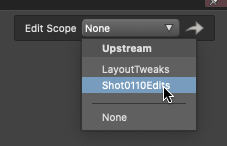
The Edit Scope UI appears in the top right of the Viewer. It allows you to select which EditScope should be used. At the moment, this includes the Viewer's Transform and Camera tools.
If no Edit Scope is selected, then the tools will behave the same as they did in previous versions of Gaffer. They will search up the graph and attempt to find a suitable node to edit. If none is available, the tool will be disabled.
When an Edit Scope is selected, then the tool will create nodes inside of the Edit Scope as required to effect any changes you make using the tools.
The Jump menu

allows you to quickly view the UI of any of the Edit Scope's SceneProcessors.
We hope that, over time, this will facilitate 'single panel' workflows that minimise the need to jump between many different editors and views.
Inside an Edit Scope

An Edit Scope is a special kind of Box. As such, you can use them in similar ways. Gaffer's tools will create one or more SceneProcessor nodes (the generic name for the type of node's made by an scope aware tool).
SceneProcessors are blue and sport the cog icon seen on the EditScope itself. They also always use the "Edits" name suffix. This is to help differentiate nodes that have been made automatically by a tool and nodes you (or a colleague) have made.
You can always add nodes of your own inside an EditScope, just as you would inside a Box. The only requirements are that the connection from in to out are maintained.
The majority of nodes made by scope aware tools will make use of an internal node network driven by a Spreadsheet node. It's perfectly fine for you to edit these nodes yourself in the Node Editor. Deleting a row from a TransformEdits spreadsheet for example, will simply remove the edit for that row's location.
Further Reading
- The Edit Scope design document.
