Gaffer 1.2.1.0 released
We're pleased to announce the release of Gaffer 1.2.1.0, the first feature update to Gaffer 1.2. This post highlights new features introduced in 1.2.1.0, and recaps some of the key features recently introduced in 1.2.0.0.
Notably, Gaffer 1.2 marks the first official release of Gaffer on Windows, the first release with the Cycles renderer available by default, and brings a variety of new features and improvements including mute and solo of lights, animation curve pre & post infinity extrapolation modes, USD updates, performance improvements and more.
Gaffer 1.2.1.0 brings further improvements by introducing the Set Editor, new nodes for procedural geometry manipulation, and adds width and height parameters to Arnold quad lights.
Read on for more details of the features and improvements, and please refer to the releases page for downloads and the full list of changes.
What's new in 1.2.1.0
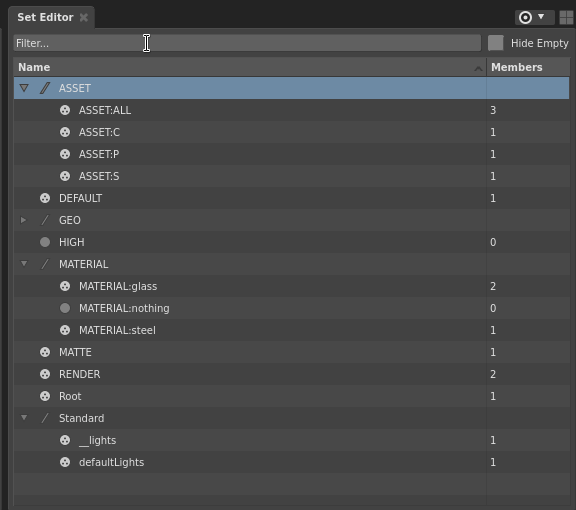
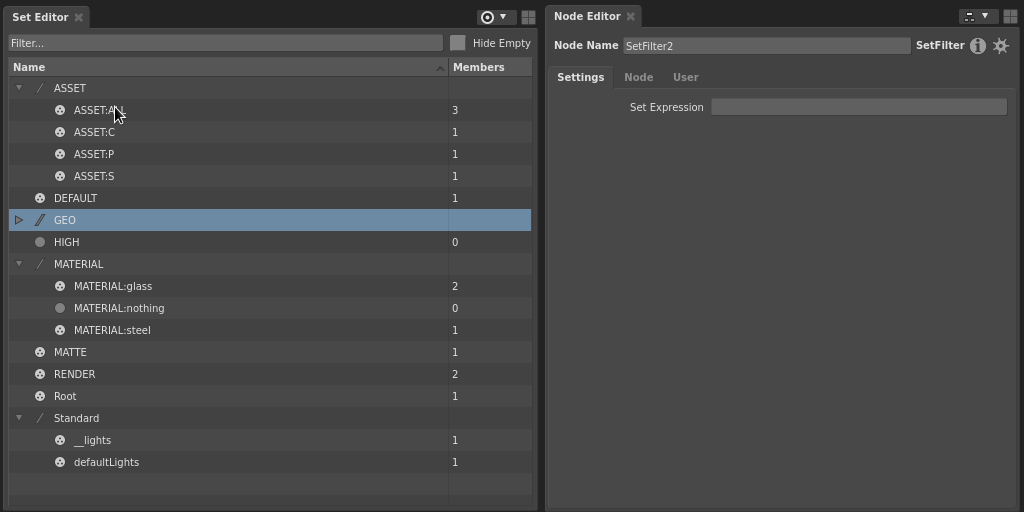
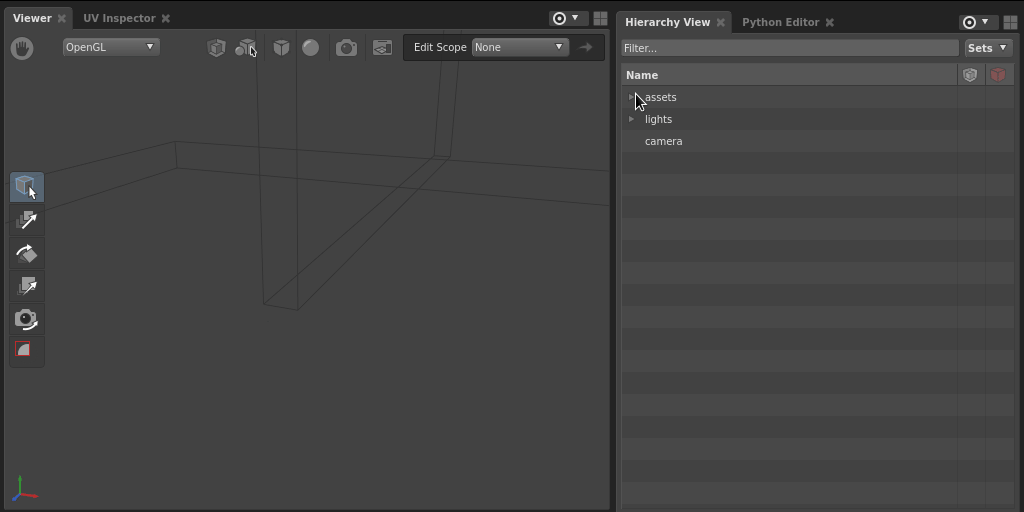
Set Editor
The Set Editor is a new panel that provides access to the sets within a Gaffer scene. This initial release focuses on inspection, allowing hierarchical browsing of sets while providing access to set names and their members via drag-and-drop and copy/paste.
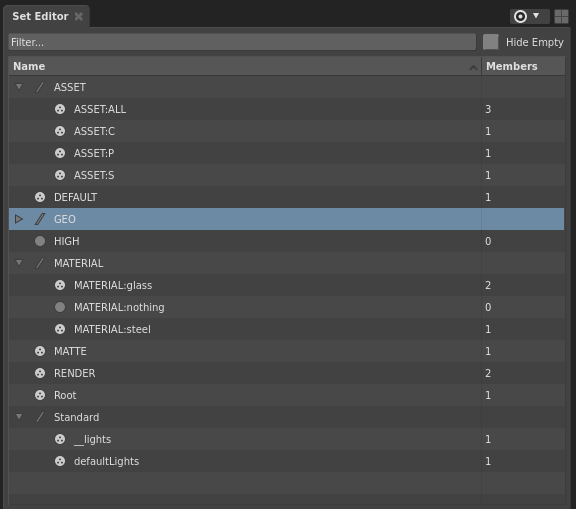
Within the Set Editor, sets are grouped using ":" characters in set names as hierarchical separators. Sets named "ASSET:A" and "ASSET:B" would be grouped together under "ASSET", while sets named "MATERIAL:A" and "MATERIAL:B" would be grouped under "MATERIAL". Gaffer's standard sets are grouped under "Standard".
Sorting and Filtering
Sets can be sorted by name or member count by clicking on the appropriate column header, filtered by name using Gaffer's standard wildcard matching, and empty sets omitted from display by enabling Hide Empty.
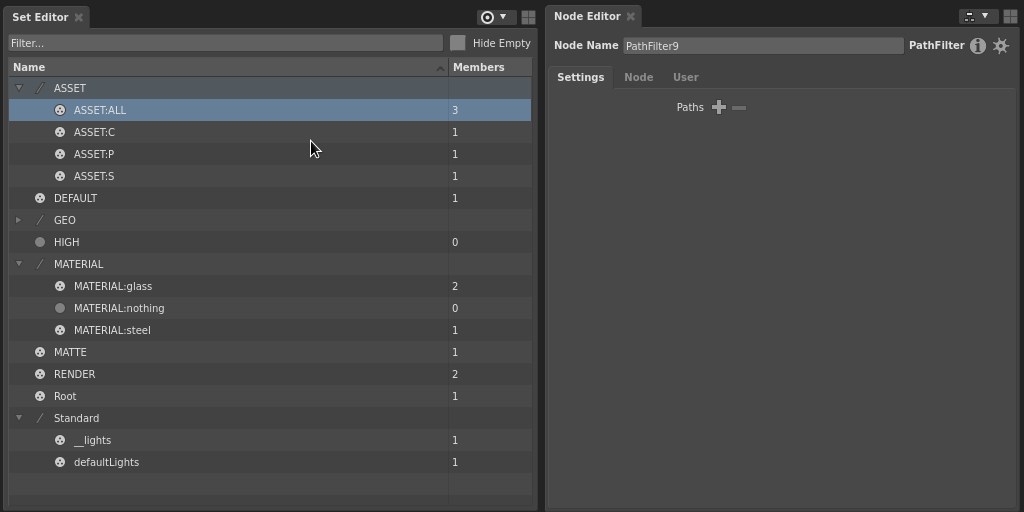
set names and members
Set names can be dragged from the Name column or copied via the Copy Set Names context menu action. The Ctrl+C shortcut also copies the selected set names.
Set members can be dragged from the Members column or copied via the Copy Set Members context menu action. The Ctrl+Shift+C shortcut also performs this action.
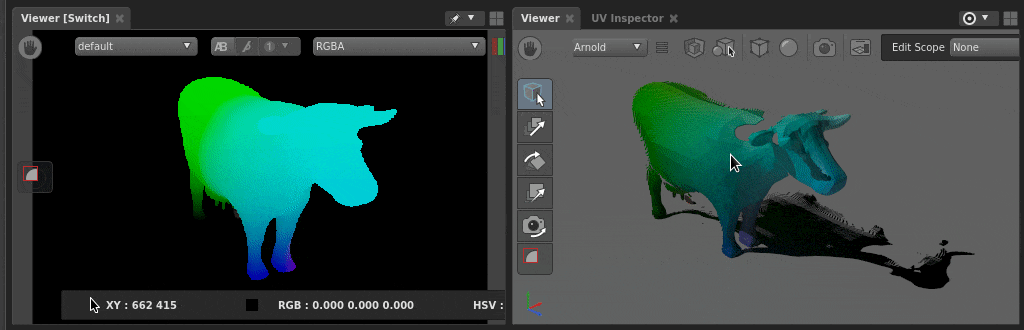
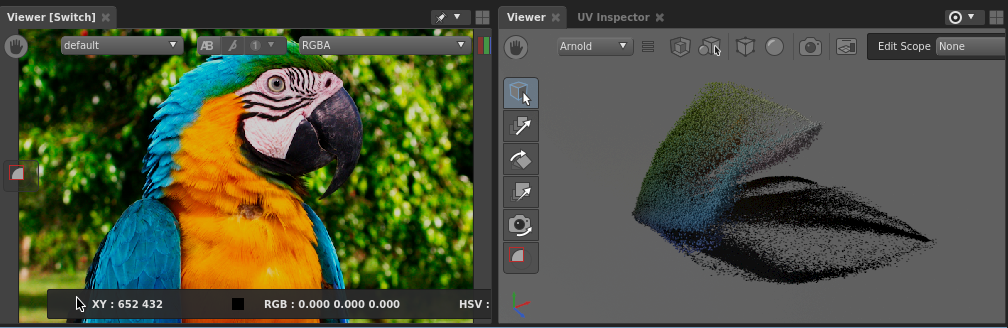
ImageToPoints Node
The ImageToPoints node generates a Points Primitive from an input image, creating a point for each pixel in the image. Point positions are defined from the image's original pixel coordinates or from an image layer providing position data. Arbitrary image channels can be converted to additional primitive variables, and transparent pixels can be omitted from the conversion.
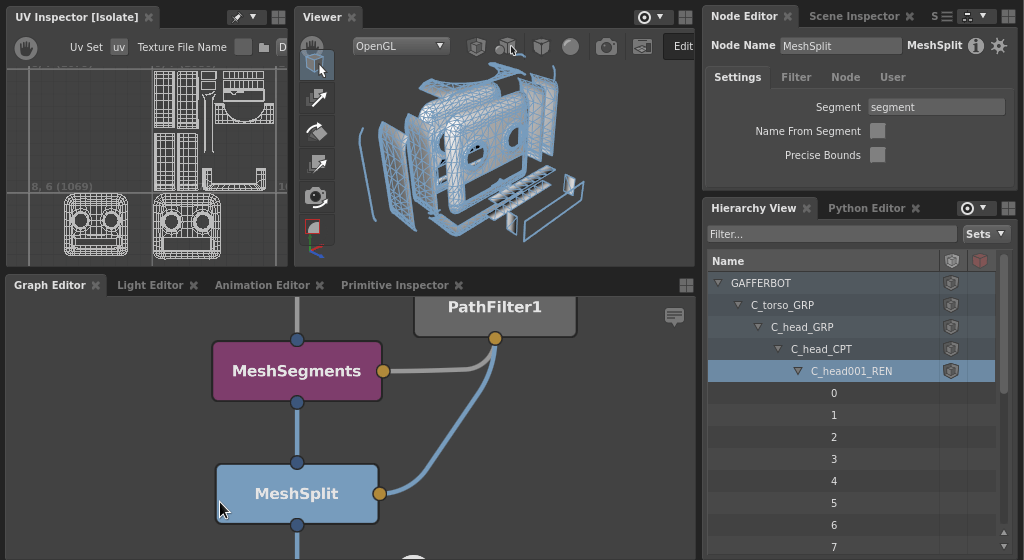
MeshSplit Node
The MeshSplit node splits a Mesh Primitive into multiple meshes based on the values of a Uniform (per-face) primitive variable. The newly split meshes are created as child locations of the original mesh.
When combined with the MeshSegments node introduced in Gaffer 1.1.8.0, meshes can now be split based on connectivity, UV islands or from other indexed primitive variables.
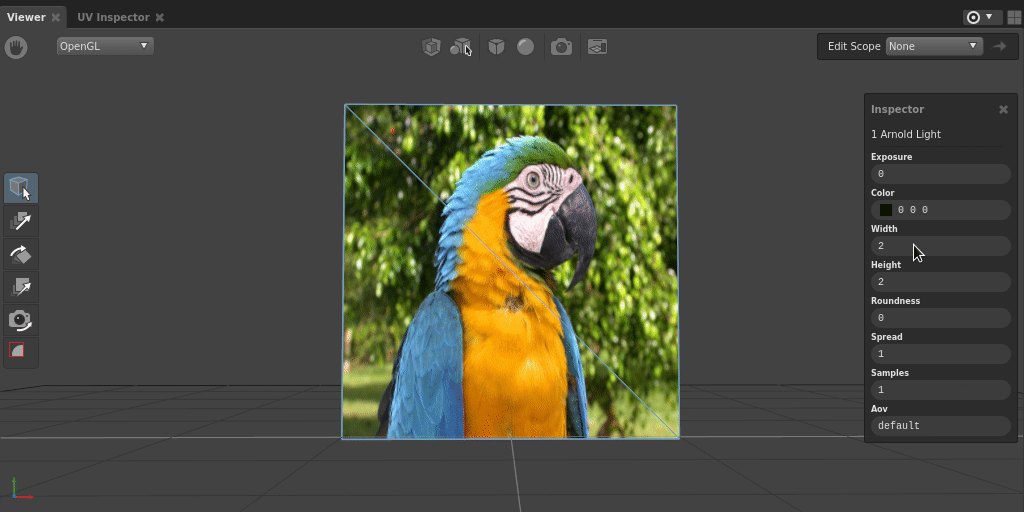
Arnold QuadLight Width and Height
Arnold QuadLights now have width and height parameters, allowing for width and height to be defined without the need to scale the light. These parameters pave the way for dedicated light manipulators that will arrive in a future Gaffer release.
1.2.1.0 Release Notes
For a full list of changes in Gaffer 1.2.1.0 please refer to the release notes.
What's new in 1.2.0.0
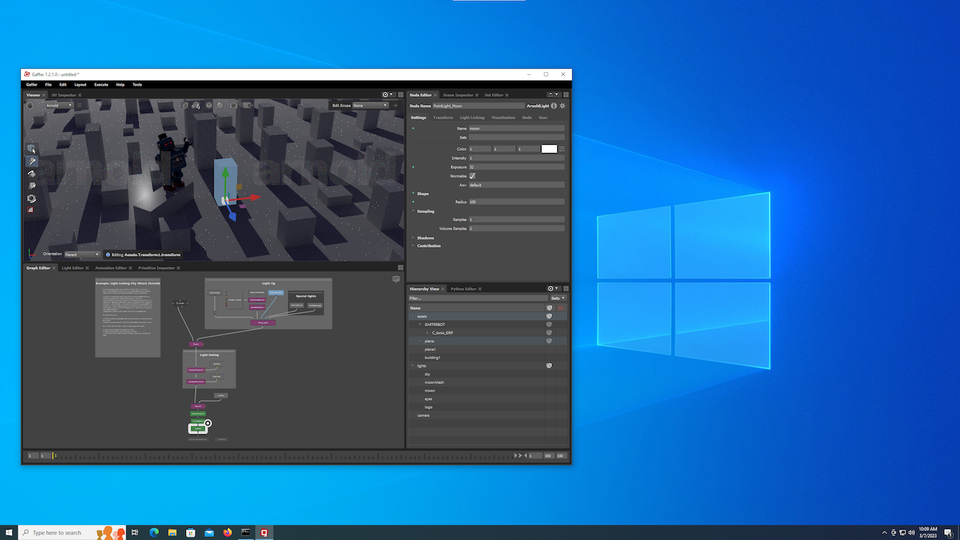
Windows Releases
We're extremely pleased to announce availability of Gaffer on Windows. Windows releases are now built, tested and published in parallel with Linux releases, and can be downloaded from GafferHQ or the GitHub releases page.

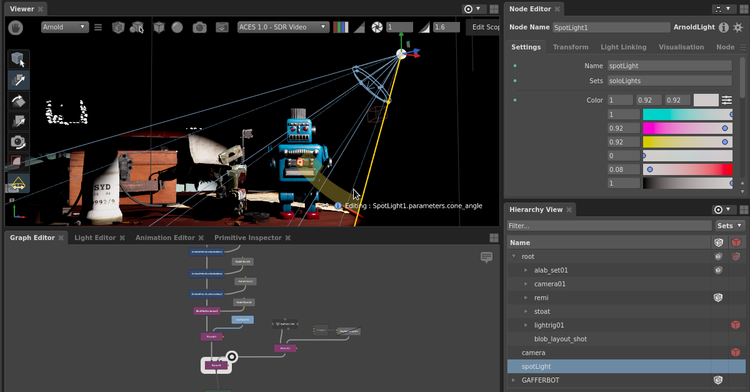
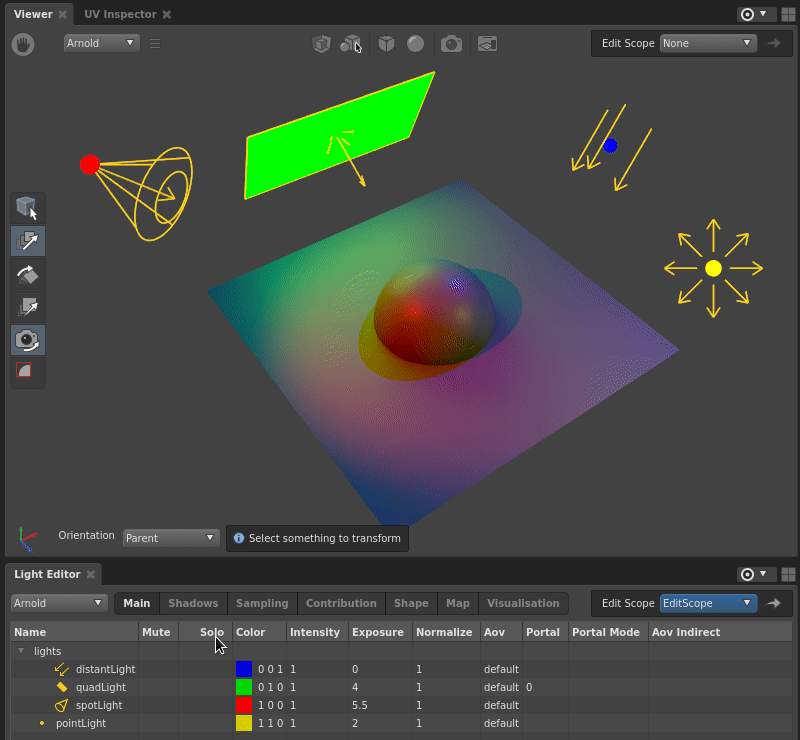
Light Mute & Solo
Lights can now be muted and soloed, allowing for more control and easier inspection of light contribution. Muted lights do not illuminate the scene, and soloed lights are the only lights that illuminate the scene. Mute and Solo can be used in combination, and affect the behaviour of lights in Interactive and Batch renders as well as when using Arnold and Cycles in the Viewer.
tipA light is considered muted by the presence of a light:mute attribute with a value of 1.
A light is considered soloed if it is a member of the soloLights set. Multiple lights can be soloed at the same time by making them all members of soloLights.
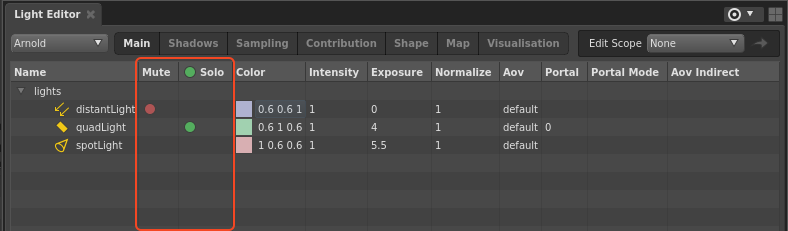
Mute and Solo in the Light Editor
The Light Editor panel has newly added Mute and Solo columns. These columns provide a direct way of modifying the mute and solo state of lights and an overview of any muted or soloed lights in the scene.
Muting Lights
A light can be muted by enabling its Mute column in the Light Editor. This results in the light gaining a light:mute attribute with a value of 1, with the attribute edit being applied within an Edit Scope where available.
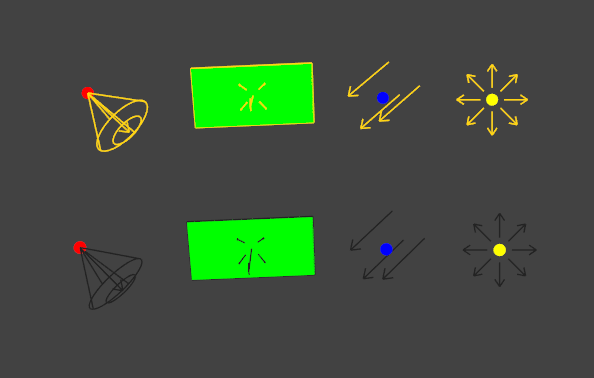
To show that it is muted, a red circle

will appear in the light's Mute column.

Groups of lights can also be muted. If the light is inheriting light:mute from a muted ancestor, a faded red circle

will appear instead.

Soloing Lights
A light can be soloed by enabling its Solo column in the Light Editor. This results in the light being added to the soloLights set, with the set membership edit being applied within an Edit Scope where available.
To show that it is soloed, a green circle

will appear in the light's solo column.
If any lights are soloed, a green circle
will also appear in the column header, this provides a convenient reminder that soloing is currently in effect.
tipSoloing a muted light does not cause the light to emit, the light will also need to be unmuted before it can illuminate the scene.
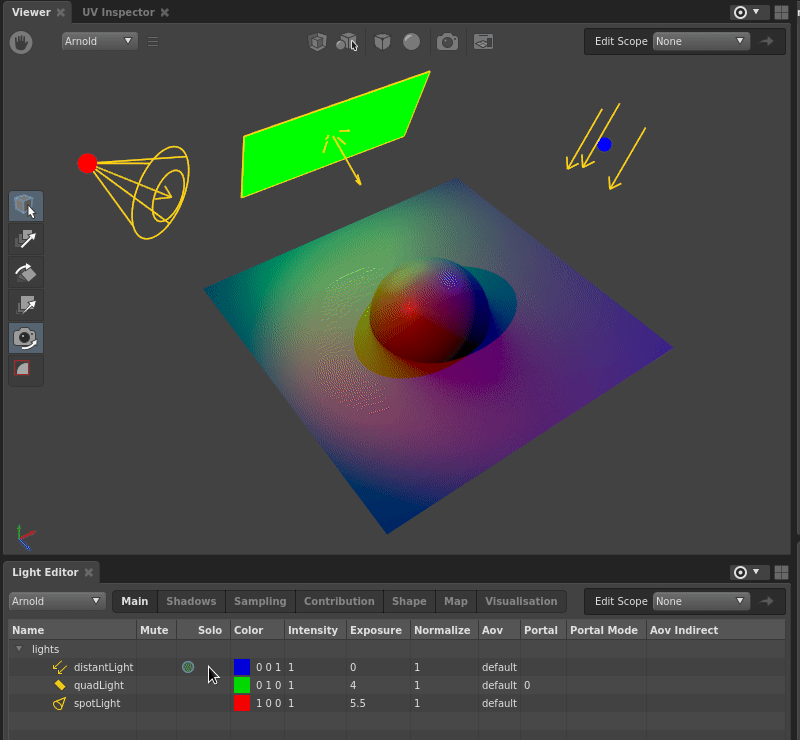
Lights in the Viewer
Lights that aren't contributing to the scene due to being muted or because other lights are currently soloed will draw in the Viewer as dark grey, rather than the usual yellow.
Expansion Management Improvements
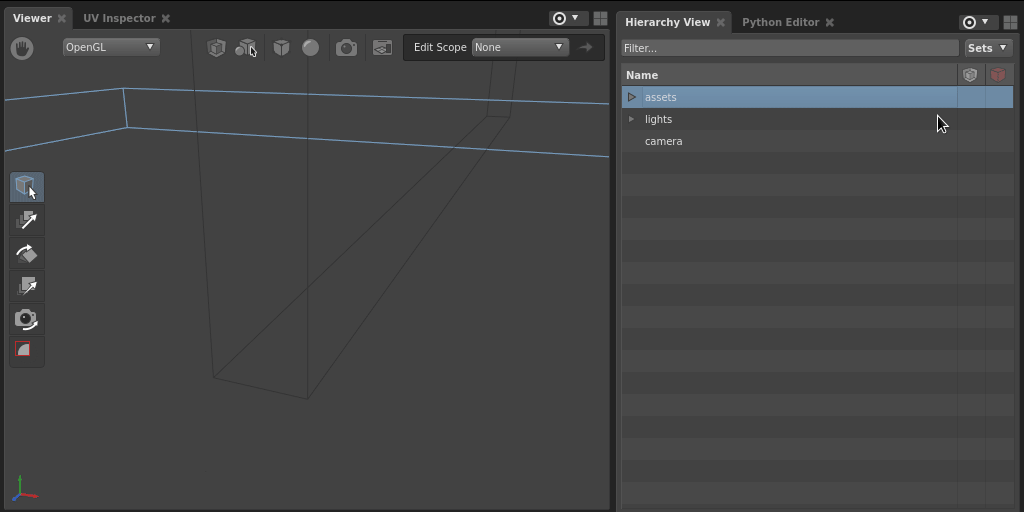
To enable efficient interaction with complex scenes, Gaffer computes and draws the scene in the Viewer on-demand and as necessary, with most scene locations beginning "collapsed" as a bounding box until the user requires a more detailed representation. In complex production scenes, it is common for only a subset of the entire scene to be drawn at a time, with this subset controlled by the user expanding scene locations in the Hierarchy View.
Gaffer 1.2 improves upon this by introducing a new concept to manage what is drawn in the Viewer, the Visible Set. The Visible Set allows users to define the locations that should be included or excluded from the Viewer independently of the expansion state of the Hierarchy View.
Locations included in the Visible Set and their descendants are always drawn in the Viewer. This allows the included branches of the scene hierarchy to remain visible while collapsed in the Hierarchy View.
Locations excluded from the Visible Set and their descendants are never drawn in the Viewer, remaining displayed a collapsed bounding box even when expanded in the Hierarchy View. Exclusions can be used to prevent expensive or unnecessary branches of the scene hierarchy from being drawn.
Locations neither included nor excluded behave as usual, following the established "draw what is expanded" behaviour.
infoNote that the Visible Set only controls what is drawn in the Viewer. Interactive and Batch renders will still expand and render the entire scene contents.
Hierarchy View Columns
Inclusions

and Exclusions

can be managed via two new columns in the Hierarchy View.
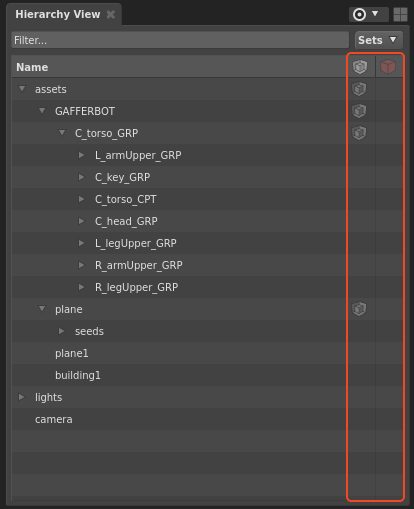
Including Locations
Clicking within the Inclusions
column will add the currently selected locations to the Visible Set, allowing those branches of the scene hierarchy to be drawn in the Viewer while collapsed in the Hierarchy View.
Included locations are decorated with a
icon. Clicking on this icon will remove the selected location(s) from the Visible Set. Shift-clicking will remove the location and all of its descendants, useful to clear any and all inclusions from a branch of the scene hierarchy.
Locations with included ancestors are decorated with a faded
icon signifying that they are drawn in the Viewer due to their ancestor being included, but haven't been specifically included.
Locations with included descendants are decorated with a

icon as a hint that locations have been included within that branch of the hierarchy.
Excluding Locations
Clicking within the Exclusions
column will exclude the selected locations from the Visible Set, preventing those branches of the scene hierarchy from being drawn in the Viewer.
Excluded locations are decorated with a icon signifying that they are not drawn in the Viewer.
Clicking on this icon will remove the location from the Visible Set, resulting in it no longer being excluded. Shift-clicking will remove the location and all of its descendants, useful to clear any and all exclusions from a branch of the scene hierarchy.
Locations with excluded ancestors are decorated with a faded icon signifying that they are not drawn in the Viewer due to their ancestor being excluded.
Locations with excluded descendants are decorated with a icon as a hint that locations have been excluded within that branch of the hierarchy.

Combining Inclusions and Exclusions
Exclusions override inclusions, allowing for descendants of an included location to be selectively excluded from the Viewer, such as in the example below.

Animation Curve Extrapolation
Animation curves can now have their pre and post infinity behaviour defined via a new Curve tab in the Animation Editor. This behaviour defines how each animation curve is extended beyond the first or last key and allows repeated or cyclic values to be animated with a minimum of keyframes.
Extrapolation Modes
Constant
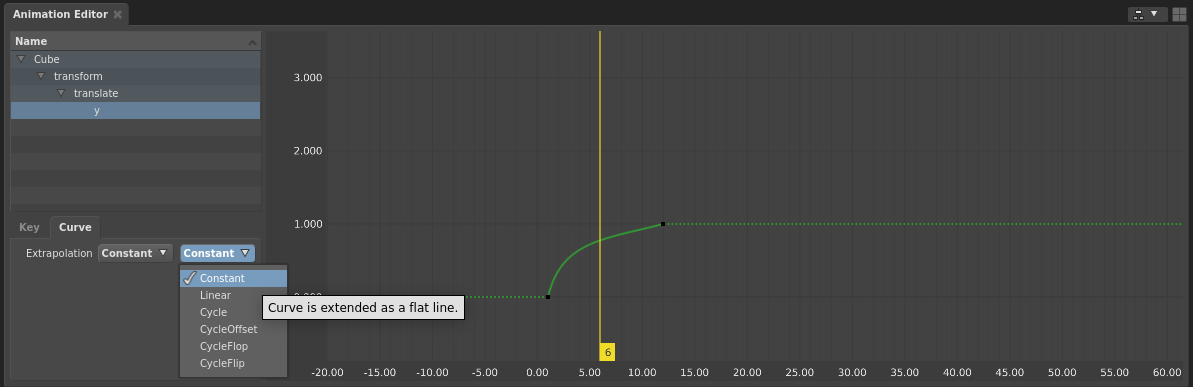
The curve extended as a flat line with the value of the extrapolated key held.
Linear
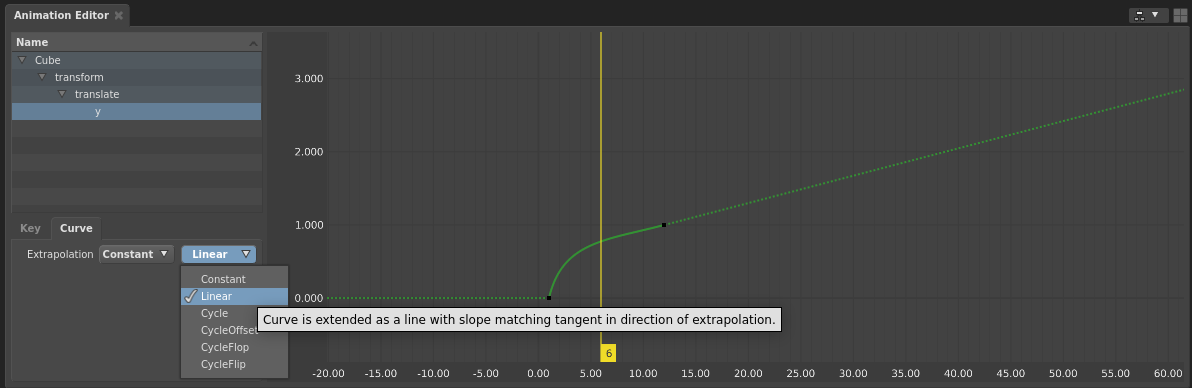
The curve is extended linearly, matching the tangent of the extrapolated key.
Cycle
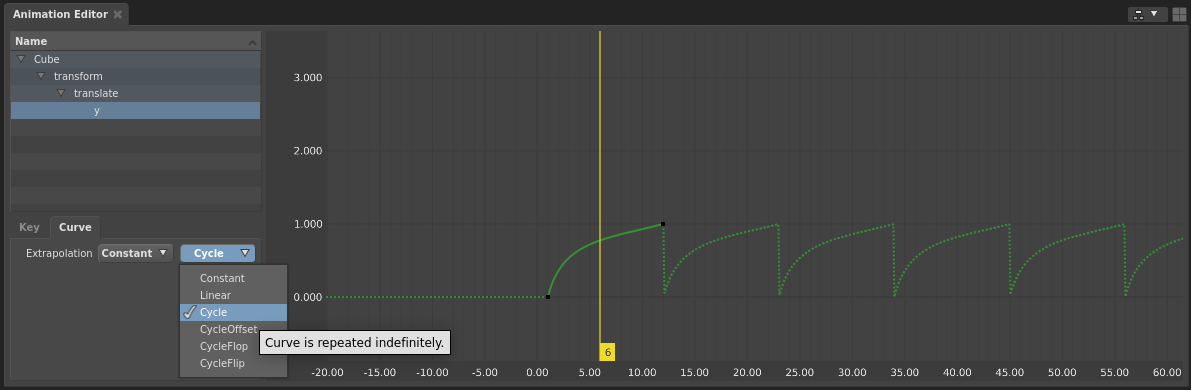
The curve is repeated indefinitely.
CycleOffset
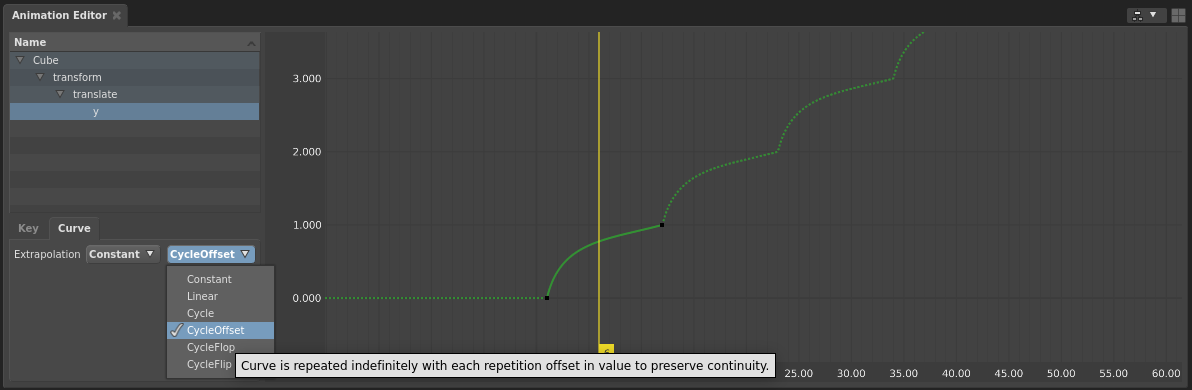
The curve is repeated indefinitely, with each iteration offset to begin at the end of the previous.
CycleFlop
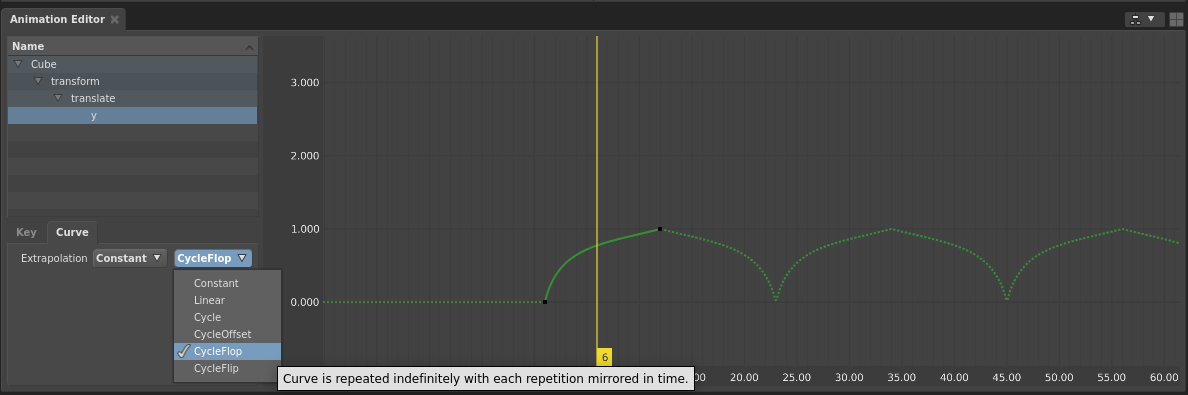
The curve is repeated indefinitely, with each iteration flopped horizontally.
CycleFlip
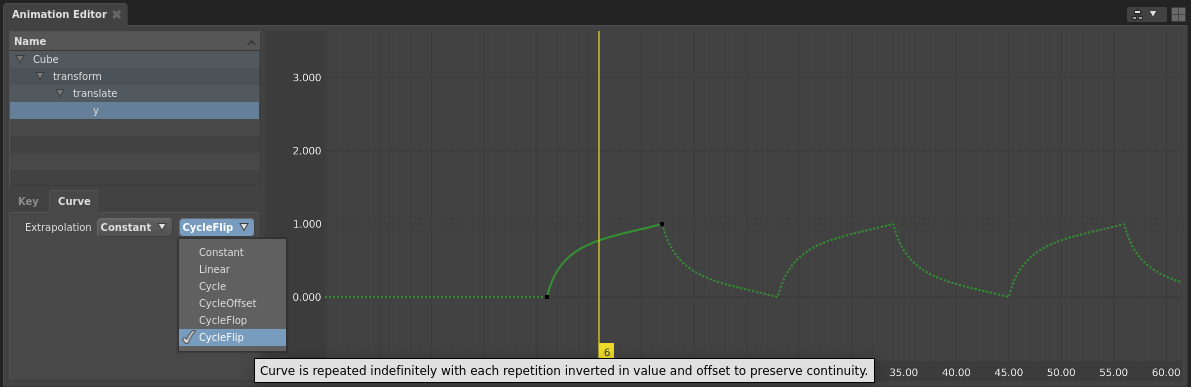
The curve is repeated indefinitely, with each iteration flipped vertically and offset to begin at the end of the previous.
Node Editor Interactivity Improvements
Node Editor interactivity has been improved by allowing updates to be computed in the background, this prevents the UI from hanging while waiting for results of expensive computes.
OSL Batched Execution
The OSLObject and OSLImage nodes now take advantage of OpenShadingLanguage's recently added SIMD batched shading API, resulting in faster computation of heavy shaders. We've seen improvements of 3x over Gaffer 1.1 in some benchmarks.
1.2.0.0 Release Notes
For a full list of changes in Gaffer 1.2.0.0 please refer to the release notes.